Serving and Storage Tips
When it comes to serving your specially crafted jam biscuits, there are a few tips to elevate the experience. **Serve them warm for the best taste** – simply pop them in the oven for a few minutes before indulging. Pair them with a freshly brewed cup of tea or coffee to complement their flavor.
If you want to enhance the presentation for guests, consider adding a dusting of powdered sugar on top. This not only enhances the aesthetic but also adds a subtle sweetness. Fresh mint leaves or a small side of whipped cream can further elevate the plate.
Proper storage is key to maintaining the freshness and texture of your jam biscuits. Store them in an airtight container at room temperature to keep them from becoming stale. They will last up to a week if stored this way.
For longer storage, you can freeze the jam biscuits. Place them in a single layer on a baking sheet to freeze initially; then, transfer them to an airtight container or zip-top bag. They can be frozen for up to three months without losing quality.
Reheating frozen biscuits is simple. Preheat your oven to 350°F (175°C) and warm the biscuits for about 10 minutes. **This will bring back their freshly baked texture and taste**.
Labeling your storage containers with the date ensures you keep track of their freshness. Properly stored and
Ever wondered why jam biscuits are such a universally beloved treat in tea time traditions around the world? These delicious delights are not only a favorite among children but also impress the most sophisticated palates. Their rich, crumbly texture combined with sweet, tangy jam filling creates a perfect balance of flavors.
Originating as far back as the 19th century, jam biscuits have evolved from simple recipes to gourmet creations. Statistics state that almost 60% of households keep a jar of jam handy, making these biscuits an easy and accessible recipe. With just a few main ingredients—flour, butter, sugar, and, of course, jam—these biscuits are a quick solution for any gathering or satisfying afternoon snack.
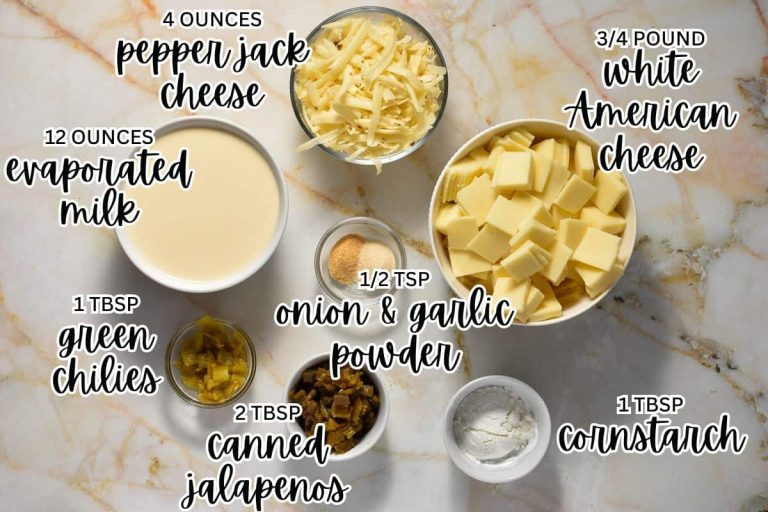
Ingredients
To make delicious jam biscuits, you need only a few basic ingredients. Each item plays an important role in ensuring the biscuits turn out perfectly crumbly and sweet. Here’s what you’ll need:
- 2 cups all-purpose flour
- ½ cup granulated sugar
- ¾ cup unsalted butter (cold and cubed)
- 1 large egg
- 1 teaspoon baking powder
- ¼ teaspoon salt
- ½ cup of your favorite jam
General Information
Making jam biscuits is a delightful and rewarding experience. It’s essential to understand the general aspects of the recipe before starting. This helps in planning and ensures the best results.
General Information
This table provides details about the general information of making jam biscuits.
These details include making difficulty, preparation and cooking time, and serving size.
| Category | Details |
|---|---|
| Making Difficulty | Easy |
| Preparation Time | 15 minutes |
| Cooking Time | 12-15 minutes |
| Serving Size | 24 biscuits |
| Meal Type | Dessert/Snack |
Instructions
Creating jam biscuits at home is simple and fun. Follow these detailed steps to ensure your biscuits come out perfect every time. Make sure to preheat your oven before you start preparing.
Step 1: Mix the Dry Ingredients
First, gather all your dry ingredients—flour, sugar, baking powder, and salt. In a large bowl, whisk these ingredients together to ensure they are well combined. This step is crucial for even baking.
Whisking the dry ingredients helps to break up any clumps. It also evenly distributes the baking powder and salt throughout the flour. This will give your biscuits a consistent texture and flavor.
Step 2: Add the Butter
Next, you need to add cold, cubed butter to the dry mixture. Use a pastry cutter or your fingers to mix the butter into the flour until the mixture looks like breadcrumbs. The butter should be well incorporated but still visible in small pieces.
This step ensures the biscuits have a flaky texture. The small pieces of butter will melt during baking, creating tiny pockets of air. This makes the biscuits light and crumbly.
Step 3: Mix the Wet Ingredients
In a separate bowl, beat the egg lightly. Add it to the flour and butter mixture. Mix until the dough starts to come together.
If the dough feels too dry, you can add a tablespoon of cold water. Be careful not to overwork the dough. Overmixing can result in tough biscuits.
Step 4: Shape the Biscuits
Sprinkle some flour on a clean surface and roll out the dough to about 1/4 inch thick. Use a round cookie cutter to cut out biscuit shapes. Make a small well in the center of each round using your thumb.
The well in the center is where you will place the jam. Make sure the well is deep enough to hold a good amount of jam without leaking.
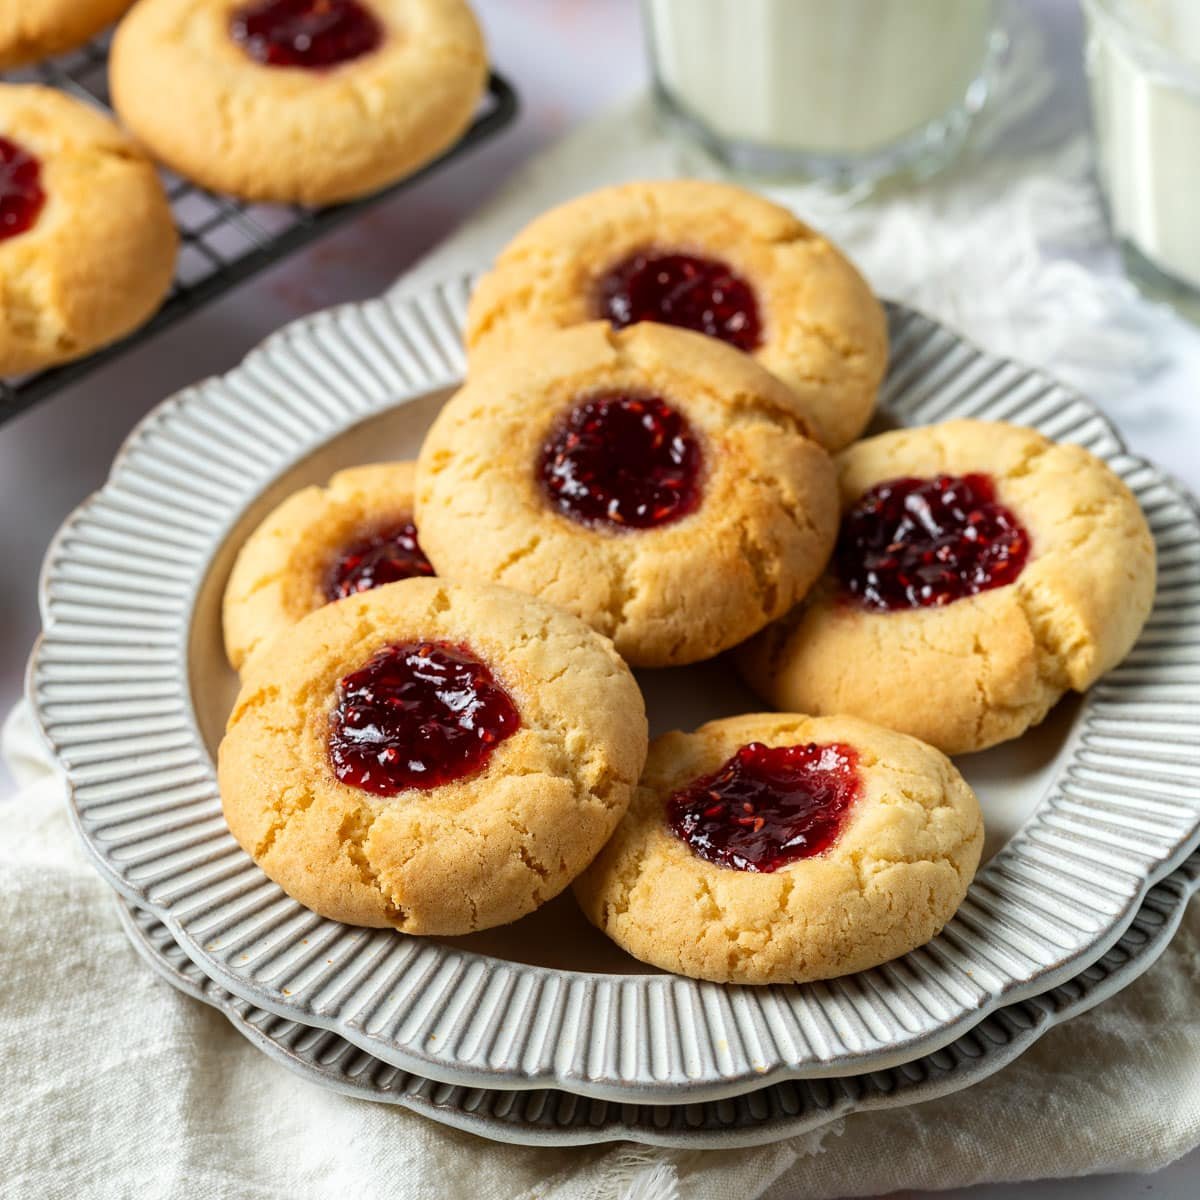
Step 5: Add the Jam and Bake
Fill each well with your favorite jam. Be careful not to overfill, as the jam can bubble over during baking. Place the biscuits on a baking sheet lined with parchment paper.
Bake in a preheated oven at 350°F (175°C) for 12-15 minutes. The biscuits should be golden brown around the edges. Let them cool on a wire rack before serving.
Important Things to Keep in Mind
When making jam biscuits, always use cold butter. Cold butter is crucial because it creates a flaky texture in the biscuits. Warm butter can make the dough too soft and harder to handle.
Ensuring the dough consistency is another important aspect. The dough should neither be too wet nor too dry. If needed, add a little cold water or an extra tablespoon of flour to get it just right.
Choosing the right type of jam can make a big difference. Thicker jams work best because they stay contained within the biscuit. Watery jams can leak out and burn on the baking sheet.
Pay attention to the baking time. Overbaking can make your biscuits too hard, while underbaking can leave them doughy. **Always check for a light golden color around the edges**.
Lastly, let the biscuits cool completely before serving. Cooling helps the biscuits set properly and become firmer. This also ensures that the jam filling won’t be too hot to eat.
Storing your biscuits correctly ensures they stay fresh longer. Store them in an airtight container at room temperature. They can stay fresh for up to a week, or you can freeze them for longer storage.
Serving and Storage Tips
Serving jam biscuits can be a delightful experience. **Serve them warm** with a cup of tea or coffee for the best flavor. You can also add a sprinkle of powdered sugar on top for an extra touch.
For special occasions, consider serving jam biscuits with a side of whipped cream or ice cream. This adds a creamy contrast to the sweet and tangy jam. Fresh fruit can also be a nice addition.
When it comes to storing your jam biscuits, proper techniques are crucial. Use an airtight container to keep them fresh. This will help prevent the biscuits from becoming stale.
If you need to store the biscuits for more than a week, freezing is a good option. Place the biscuits in a single layer on a baking sheet to freeze. Once frozen, transfer them to a zip-top bag or airtight container.
To reheat frozen biscuits, preheat your oven to 350°F (175°C). Place the biscuits on a baking sheet and warm them for about 10 minutes. They will taste almost as fresh as when they were first baked.
Always make sure to label your storage containers with the date. This helps you keep track of how long they’ve been stored. Proper labeling ensures you enjoy your biscuits at their best.
Frequently Asked Questions
Here are some common questions and answers related to making jam biscuits. These insights will help ensure that your baking experience is smooth and enjoyable. Let’s dive in!
1. What type of jam is best for making jam biscuits?
The best type of jam for making jam biscuits is one that is thick and not too watery. Thicker jams stay in place during baking and do not run out of the biscuits.
Popular choices include raspberry, strawberry, and apricot jams. If you use a homemade jam, make sure it has a good consistency to avoid spillage during baking.
2. Can I use margarine instead of butter?
Yes, you can substitute margarine for butter in the recipe. However, remember that margarine has a higher water content which might affect the biscuit’s texture.
Butter gives a richer flavor and a better crumble. If you use margarine, choose a high-quality one with a lower water content to achieve similar results.
3. How do I achieve a flaky texture in my jam biscuits?
Achieving a flaky texture involves using cold butter and not overworking the dough. The cold butter creates layers as it melts during baking, giving the biscuits a light and flaky texture.
Also, handle the dough gently and mix only until combined. Overmixing can cause the dough to become tough, leading to denser biscuits.
4. Why should the biscuits be completely cooled before storing?
Cooling the biscuits completely before storing ensures they maintain their texture and freshness. If you store them while they are still warm, the trapped moisture can make the biscuits soggy.
Moreover, cooling prevents condensation inside the storage container, helping the biscuits stay crisp. Ensure they are at room temperature before packing them away.
5. How can I prevent my jam biscuits from spreading too much?
To prevent jam biscuits from spreading too much, make sure to chill the dough before baking. Chilling helps the butter firm up and reduces the spread during baking.
You can also limit the amount of jam used and ensure the wells are properly made in the dough. This prevents overflow and maintains the shape of the biscuits.
Easy Butter Cookies Recipe – Scrumptious Butter Cookies with Jam
Conclusion
Crafting the perfect jam biscuits involves a blend of careful ingredient selection and precise techniques. From choosing the right type of jam to ensuring the dough’s consistency, each step plays a crucial role in the final result. Attention to detail transforms a simple recipe into a delightful treat.
By following the tips and instructions shared, you can create jam biscuits that not only taste great but also impress. Whether serving them fresh or storing them for later, these biscuits are sure to be a hit. Enjoy the process and savor the delicious results!